


Source images:


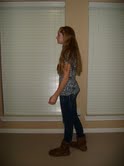


To create this image, I started with a old piece of paper background on a dark filled layer. Then, I went to Filter>Render>Clouds and took an large eraser tool to delete some of the cloud areas. I changed the mode to Color Burn and the opacity to 75%. I took the image of myself and placed it in the image. Next, I added a layer mask>reveal all. I placed the cougar head on my body and positioned it. I put the layers holding the images on me and the cougar head in a new folder, and converted the folder into a new Smart Object. I then selected this smart object and placed some guide lines in the middle of the design. Then, I duplicated the smart object, applied a Motion Blur angle of 0 degrees, a Distance of 50px, and placed the layer below the original. I changed the original layer to color burn, and set the opacity to 25%. Then, set the layer's blending mode to hard light and moved the "clouds" layer above all the layers in the layer's palette. Next, I placed a Sunburst shape in the design, rasterized the shape, change the mode to overlay and set the opacity to 75%. I Ctrl-clicked the layer with me in it, selected the "Sunburst" layer and deleted the selection. I applied a Layer Mask>Reveal All to the "Sunburst" layer. Then, I drew some random splatters with different brushes. I gave the layer with me in it a drop shadow. I took a wallpaper image and saved it as a pattern. Then, I went into the design and added a rectangle filled with the pattern and desatured some of the areas. Then, I added a Layer Mask> Hide All and added in some areas of the pattern. Then, I Ctrl-clicked the layer with me in it and clicked the texture layer and used the fill tool to fill the selection. I changed the mode to multiply. I did the same thing with a retro image. I selected the words out of the example imaged and put them on my image with a drop shadow. Then, I added some pieces of paper with a drop shadow. I used the brush tool to shape them. I added my last name in different typefaces in the paper. Lastly, I added the words "Tuts" using the text tool, changed the mode to overlay and duplicated its layer. The hardest part of the project was adding in the retro image and the easiest part was adding the text. I think this project was really neat and I like the way it turned out.
No comments:
Post a Comment